
In this tutorial we'll show you how to use two Wii Nunchuks and code your own unique fast-paced game called The Secret Labyrinth.
We love mazes here at the Bakery, but steering through one on a computer has its problems. Basically they are either too easy or too difficult.
This tutorial was written by Mike Cook and can be found in The MagPi issue 67.
The Secret Labyrinth is hard but intriguing. It can be played as either a two-player or single-player game. The players begin at opposite corners of a maze and have to find the centre by using a series of horizontal and vertical moves controlled by a Wii Nunchuk.
But the twist is that you can’t see the walls in the maze: if you walk into a wall then you are instantly whisked back to your starting point. There are no player turns – just move as quickly as you can – and the maze is constructed so that the path from the bottom to the centre is the mirror image of the path from the top to the centre, so both players face an identical task.
You will need
- 2 × Wii Nunchuks
- 2 × Nunchucky adapters
- Stripboard: 24 strips of 13 holes
- 74HTC4052 analogue multiplexer
- 16-pin IC socket
- Bottom-entry twin-row header sockets
- 4 × 68 kΩ resistors
- 0.1 μF ceramic capacitor
The Nintendo Wii Nunchuks
The Wii Nunchuk is a cheap and remarkable interface. While in this project we will just be using the X-Y joystick, the Nunchuk also contains two push-buttons and a 10-bit three-axis accelerometer. They are interfaced through the I2C bus to the Raspberry Pi, but there is a small problem: each device on an I2C bus needs to have a unique address and all Nunchucks have the same address, fixed in the hardware, that can’t be changed. So to get round this problem we have to split the bus by steering the I2C signal lines to one Nunchuk or the other by using an analogue multiplexer chip. The multiplexer needs to be analogue because signals can go from the Raspberry Pi to the Nunchuk, or from the Nunchuk back into the Raspberry Pi. However, all we need to do is to set the multiplexer’s select pins and talk to the Nunchuk normally, and the selected Nunchuk replies.
The schematic for this board is shown in Figure 1 and full construction is shown in the step-by-step section. The Nunchuk itself when read, sends back a block of six bytes; each byte holds different data and a map of this data is shown in Figure 2. Note how the least significant two bits of the accelerator readings are in the last byte. This allows a simple access to an 8-bit reading as often the last two bits are noise. The two push-buttons are in this last byte as well.


Making the Nunchucks interface board

Step-01: Preparing the board
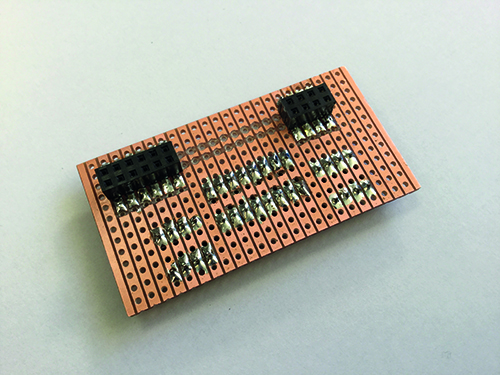
Take a piece of stripboard 24 strips wide by 13 holes high, and break the tracks shown by the dark areas with a scalpel or spot face cutter. The dotted lines show the positions of the IC socket and the four bottom-entry sockets. The board will hang over the side of the Pi, not over the printed circuit board.

Step-02: Underside of the board
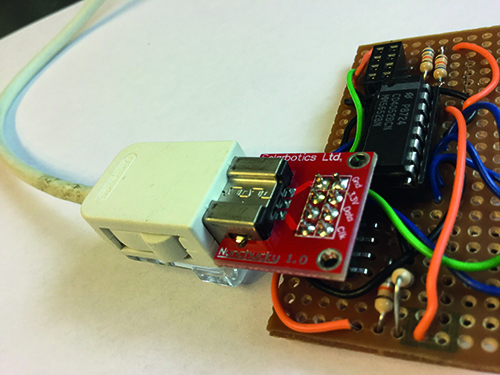
The board will be plugged into the Raspberry Pi’s GPIO header. Only six connections are needed electrically, but we have used a second four-section of socket for mechanical balance. The two four-length sections of socket are for the Nunchuk adapters to plug into. Solder these sockets up before commencing the wiring.
Step-03: Wiring up
Use stranded wire and make the links between the components, as shown in the diagram. The straight wires to adjacent holes can be made from tinned copper taken from the cut-off legs of the resistors. You can use different colour wires if you have them, but the electricity doesn't really care what colour wire it flows through.

Step-04: Solder the header pins
Solder the header pins onto the Nunchuk adaptors and plug the leads into them. Then insert them in the bottom-entry sockets on the board. Note that the Nunchuks are inserted in what we would consider to be upside-down. Plug the board into the Pi when it is unpowered, as with anything you plug into the GPIO header.
The Secret Labyrinth maze game
The game is set in a 9×9 grid with players starting at the upper and lower corners. Due to the symmetry of the maze, it is in fact a 9×5 grid that contains the maze, but there is no restriction on a player going into the other half. Each square has four possible exits and these are marked as either blocked or clear in the list that holds the definition of the maze.
So by checking the exit side of a square you want to move from, this will either allow free passage or send the player back to the start square. The maze is generated by starting at the centre and then moving in a random direction until a corner is reached. That corner becomes the start position for the player.
On each random move, the side of the square just gone through is marked as clear and the side of the destination square is also marked as clear. This allows two-way movement between these two squares during the playing phase. The sides are marked as clear by setting the appropriate bit in the maze list element for that square. This is summarised in Figure 3.

The side of each square is labelled clockwise from the top with the letters A to D. So if the maze-generating program moves from the current square through side D, then bit 3 of the maze variable is set and the square it moves to (the one immediately to the left) has bit 1 for side B also set. This then becomes the current square and another random movement is made. There are constraints to stop the random movements occurring off the edge of the playing board, so that the whole board is ringed by blocked moves; this simplifies the playing logic. When any side of a square is cleared, the mirror image of that square and side are also cleared.
The game resources
Each square of the board has a tile background chosen at random from a number of tiling strategies. Here we have implemented random tiles, diagonal rows of the same tile, displaced repeating, and all the same tile. Note how diagonal rows are simply displaced repeating with the displacement equal to one. We found that the tiling scheme as well as adding variety to the game also affected the way you play. We chose to use two versions of Tux, the Linux penguin, as the playing pieces. All tiles and playing pieces should be scaled to 72×72 pixels. We again raided the Scratch media files to get the sounds for when a player crosses a blocked boundary and is sent back to the start. A screen dump of a game in progress is shown in Figure 4.

Get the game code
The software for the project, labyrinth.py, uses our favourite Pygame frame work. It uses the smbus extension to handle the I2C interface – make sure it is enabled in the Interfaces tab of the Raspberry Pi Configuration tool. The main function is quite simple and consists of an infinite loop repeatedly playing different games. The inner while loop just plays one game by checking for an event or move and, if necessary, redrawing the screen. At the end of the game, the maze’s hidden walls are revealed for a few seconds before generating a new maze and starting the play again. The drawscreen function takes in a Boolean value that determines whether the real walls are to be shown or if every square seems to have a wall. For very small people, you might want to play the game with the walls shown – simply change False to True in the drawscreen function call to do this.
The mazeGen function is perhaps the most complex in this code. It starts off by selecting a tile strategy at random and generating a tilePlan list which stores the tile number associated with each square. In the same loop, the old maze is erased. Then the centre square is set so that it has no barriers around it and the random walk clearing the walls is begun from the centre until either top corner is visited. That completes the maze and ensures at least one path through it has been generated. We have a version of the program in our GitHub repository that uses only keyboard keys to move. Finally, the G key will give a glimpse of the walls for a second or two – only to be used if you are really stuck.
Taking it further
You could add a timer and keep a high score of the speed of a run. Or you could change the game into a turn-based affair. As the maze is symmetrical, you could – if you are clever – avoid some walls by remembering what your opponent has done. You could also change the ending point of the maze generation when it reaches the top or bottom row instead of a corner. For the more advanced, you could generate the mazes by hand, or another program, and store several of them in a file and pick the one to use at random. This would ensure a much greater variety of mazes, and allow you to make quite complex ones, but beware of making them too complex.
You can download the code from Mike's GitHub page.
import sys, random
from smbus import SMBus
import RPi.GPIO as io
import pygame, os, time

pygame.init()  # initialise graphics interface
pygame.mixer.quit()
pygame.mixer.init(frequency=22050, size=-16, channels=2, buffer=512)
os.environ['SDL_VIDEO_WINDOW_POS'] = 'center'
pygame.display.set_caption("Secret Labyrinth")
pygame.event.set_allowed(None)
pygame.event.set_allowed([pygame.KEYDOWN,pygame.QUIT])

gSpace = 70 # size of square
gSide = 9 # number of squares per side
nSquares = gSide*gSide
screenSize = gSpace * gSide
screen = pygame.display.set_mode([screenSize+2,screenSize+2],0,32)
random.seed() ; centre =  (nSquares-1) // 2
refresh = True ; joyLast = [-1,-1,-1,-1]
playPos = [0,0,0,0] # current and start position
maskFrom = [8,2,1,4]
dirInc = [-1,1,-gSide,gSide] # direction movement
wallColour = (0,255,255) # for revealed labyrinth

def main():
   global refresh, done
   done = False
   initIO()
   init() # load in sound and graphics
   mazeGen() # create maze
   while 1:
      while not(done):
         checkForEvent()
         if refresh :
           drawScreen(False) # change to True to hide view
           refresh = False
      time.sleep(3.5) # see the walls
      mazeGen()
      done = False

def drawScreen(laby):
    rSize = gSpace
    pygame.draw.rect(screen,(0,0,0),(0,0,screenSize,
screenSize),0)
    #draw Tiles
    for s in range(0,nSquares):
      xp = findX(s)
      yp = findY(s)
      screen.blit(tiles[tilePlan[s]],(xp,yp))
    #draw grid
    if not(laby) :
       for y in range(0,gSide+1):
          pygame.draw.line(screen,(255,255,0),(gSpace*y,0),
(gSpace*y,screenSize+2),2)
       for x in range(0,gSide+1):
          pygame.draw.line(screen,(255,255,0),(0,gSpace*x),
(screenSize+2,gSpace*x),2)

    #draw players & prize
    xp = findX(centre)
    yp = findY(centre)
    screen.blit(prize,(xp,yp))
    xp = findX(playPos[0])
    yp = findY(playPos[0])
    screen.blit(tux1,(xp,yp))
    xp = findX(playPos[1])
    yp = findY(playPos[1])
    screen.blit(tux2,(xp,yp))

    # draw labyrinth
    if laby :
       for s in range (0,nSquares):
         xp = findX(s)
         yp = findY(s)
         for side in range(0,4):
            if not(maze[s] & 1) :
               pygame.draw.line(screen,wallColour,(xp,yp),
(xp+rSize,yp),2)
            if not(maze[s] & 2) :
               pygame.draw.line(screen,wallColour,
(xp+rSize,yp+rSize),(xp+rSize,yp),2)
            if not(maze[s] & 4) :
               pygame.draw.line(screen,wallColour,
(xp+rSize,yp+rSize),(xp,yp+rSize),2)
            if not(maze[s] & 8) :
               pygame.draw.line(screen,wallColour,(xp,yp),
(xp,yp+rSize),2)
    pygame.display.update()

def findX(square):
   return (square % gSide)*gSpace

def findY(square):
   return (square//gSide)*gSpace

def initIO():
    global bus
    io.setmode(io.BCM)
    io.setwarnings(False)
    select = [4,17]
    io.setup(select,io.OUT)
    io.output(select,0) # select nunchuck 0
    print("Initialise I2C")
    if io.RPI_REVISION == 1:
      i2c_bus = 0
    else :
      i2c_bus = 1
    bus = SMBus(i2c_bus)
    for nun in range(0,2):
       bus.write_byte_data(0x52,0x40,0x00)
       io.output(4,1) # select nunchuck 1
       time.sleep(0.01)

def init():
    global bus,sounds, maze, tux1, tux2, prize, tiles, tilePlan
    global finish, resetPlayer
    tux1 = pygame.image.load("images/Tux1.png").convert_alpha()
    tux2 = pygame.image.load("images/Tux2.png").convert_alpha()
    prize = pygame.image.load("images/present.png").convert_alpha()
    tiles = [pygame.image.load("images/Tile"+str(t)+".png").convert_alpha()
               for t in range(0,15)]
    finish = pygame.mixer.Sound("sounds/finish.wav")
    resetPlayer = [pygame.mixer.Sound("sounds/Pop.wav"),
                   pygame.mixer.Sound("sounds/Rattle.wav")]
    maze = []
    tilePlan = []
    for sr in range(0,nSquares):
       maze.append(0) # create maze array
       tilePlan.append(0) # pattern of tiles

def readNck(nunNum):
# the I2C drivers or something throws up an occasional error - this is the sticking plaster
    io.output(4,nunNum) # select the right nunchuck
    time.sleep(0.004)
    try:
       bus.write_byte(0x52,0)
    except:
       print("bus restart")
       time.sleep(0.1)
       initIO()
       bus.write_byte(0x52,0)
    time.sleep(0.002) #delay for Nunchuck to respond
    nCk = [((bus.read_byte(0x52) ^ 0x17) +0x17) for i in range(0,6)]
    return nCk

def mazeGen():
   global maze, current, last, tilePlan, playPos, refresh
   refresh = True
   maskTo = [2,8,4,1]
   thisTile = random.randint(0,14)
   thisMethod = random.randint(0,3)
   for s in range(0,nSquares):
     maze[s] = 0 # clear the maze
     if thisMethod == 0:
        tilePlan[s] = random.randint(0,14) # random tile
     if thisMethod == 1:
        tilePlan[s] = s % 10 # diagonal lines
     if thisMethod == 2:
        tilePlan[s] = thisTile # all the same but different for each maze
     if thisMethod == 3:
        tilePlan[s] = s % 12 # offset lines
   maze[centre] = 15
   current = centre ; last = centre
   while not(current == 0 or current == 8):
      blocked = True
      while blocked:
         move = random.randint(0,3)
         direction = dirInc[move] # initial direction of move
         test = direction + current
         if test >= 0 and test <= (nSquares/2 +gSide/2) and test != last: # within the board
            if not(direction ==1 and current % gSide == gSide-1) and not(direction ==-1 and current % gSide == 0):
              blocked = False
              maze[last] = maze[last] | maskFrom[move] # clear exit square
              maze[nSquares-last-1] = swap(maze[last])
              current = test
              last = current
              maze[current] = maze[current] | maskTo[move] # clear entrance square
              maze[nSquares-current-1] = swap(maze[current]) #need to swap bits
   playPos[0] = current # player start positions
   playPos[1] = nSquares - 1 - current
   playPos[2] = playPos[0] ; playPos[3] = playPos[1] # start positions

def movePlayer(pn, inc):
   global refresh, playPos, done
   refresh = True
   fromSq = playPos[pn]
   playPos[pn] += dirInc[inc]
   if not(maze[fromSq] & maskFrom[inc]) :  # a wall in the way
      playPos[pn] = playPos[pn+2] # back to start
      resetPlayer[pn].play() # reset noise
   if playPos[pn] == centre : # winner
      finish.play()
      refresh = False
      drawScreen(True)
      done = True

def getMove():
   global joyLast
   joyNow = [-1,-1,-1,-1] # no move
   for nun in range(0,2): # read both nunchucks
      x = nun
      y = 2+nun
      bank = readNck(nun)
      if bank[0] > 190:
         joyNow[x] = 1 # move right
      if bank[0] < 60:
         joyNow[x] = 0 # move left
      if bank[1] > 190:
         joyNow[y] = 2 # move up
      if bank[1] < 60:
         joyNow[y] = 3 # move down
      if joyNow[x] != joyLast[x] and joyNow[x] > -1:
         movePlayer(nun,joyNow[x]) # move left or right
      if joyNow[y] != joyLast[y] and joyNow[y] > 1:
         movePlayer(nun,joyNow[y]) # move up or down
      joyLast[x] = joyNow[x]
      joyLast[y] = joyNow[y]

def swap(value):
  result = (value & 1) << 2 | (value & 4) >>2 |
(value & 2) << 2 | (value & 8) >> 2
  return result

def terminate(): # close down the program
    print ("Closing down please wait")
    pygame.mixer.quit()
    pygame.quit() # close pygame
    os._exit(1)

def checkForEvent(): # see if we need to quit
    global refresh
    event = pygame.event.poll()
    if event.type == pygame.QUIT :
         terminate()
    getMove()
    if event.type == pygame.KEYDOWN :
       if event.key == pygame.K_ESCAPE :
          terminate()
       getMove()
       if event.key == pygame.K_g : #glimpse maze walls
          drawScreen(True)
          time.sleep(2.0) # time to display
          refresh = True # draw over it

# Main program logic:
if __name__ == '__main__':
    main()


