
Learning how to use Terminal and enter command line commands on a Raspberry Pi is an essential skill to master. With Linux commands you can take full control of Rasbpian OS. And Terminal is an essential tool for most maker projects.
Unless you grew up in the 1980s or earlier, the chances are that you are accustomed to using only GUIs (graphical user interfaces) and desktop environments.
See! Get a free Raspberry Pi with a subscription to The MagPi magazine.
Why learn to use Terminal and the Command Line?
There’s really nothing wrong with GUIs, and Raspbian comes with a rather fine one.
But beneath the icons sits a whole other world: the command line. This is where your real computer is. With the command line, you’re not locked into doing just what desktop applications enable you to do. You can do just about anything to your computer, and you can do it much faster.
Think of it like driving a car. If you’ve only ever used a GUI then you’re driving an automatic. The command line is like switching to manual. It’s a lot trickier, but you get far more control and feel like a proper driver.
The command line can be daunting for newcomers, but it really needn’t be. With just a few commands, you can master the command line.
https://www.raspberrypi.org/magpi/issues/essentials-gpio-zero-v1/
See also:
- Command line Raspberry Pi
- Command line web browser: internet search from BASH terminal
- Conquer the Command Line
- Customise the command line
Learn to use Terminal on a Raspberry Pi
When you boot a Raspberry Pi, you start by default inside the desktop interface.
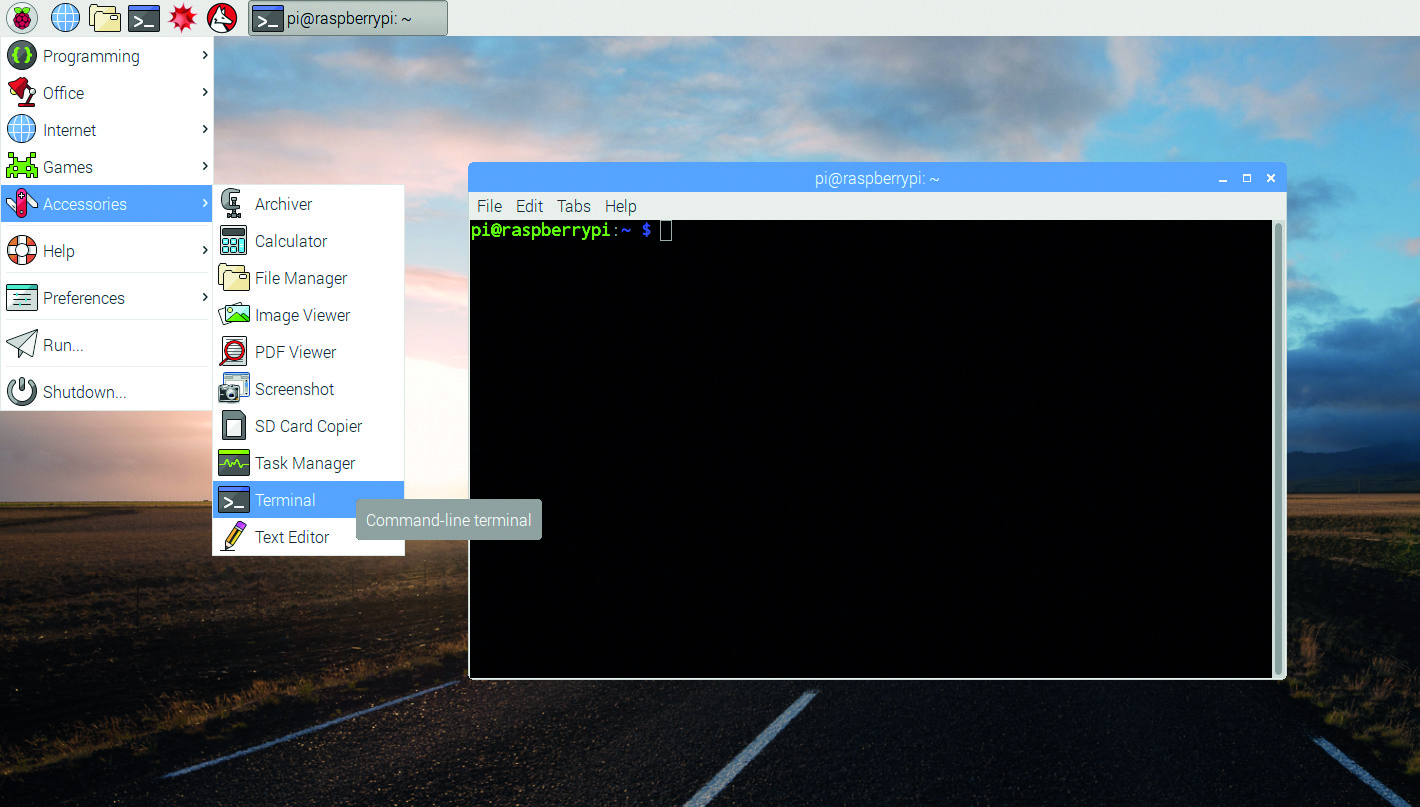
The fastest way to get access to the command line is through the Terminal app.
Click on the Terminal icon in the top menu bar (or choose Menu > Accessories > Terminal). A window opens with a black background and some green and blue text. You will see the command prompt:
pi@raspberrypi:~ $
You are now at the command line. You enter commands using the text interface. Enter echo Hello World and press RETURN, you’ll see ‘Hello World’ printed on the line. Below this is another $ prompt, ready to accept another command.
Most users get to the command line via the Terminal app, but there is another way known as ‘virtual console’. Press CTRL+ALT+F1 and the desktop will vanish. A black screen appears, displaying ‘Raspbian (or Debian) GNU/Linux 8 raspberry pi tty’ and below it, ‘raspberrypi login’. If you are not automatically logged in , enter pi and press RETURN, then enter your password (raspberry by default).
You can now use the command line in full-screen mode. You can get back to the desktop using CTRL+ALT+F7 and switch back to the virtual console using CTRL+ALT+F1. Additional virtual consoles can be accessed using CTRL+ALT+F2 to F6. Each has its own login and operates independently.
If you prefer the command line, you can boot Raspbian directly to the command line instead of the desktop. Open Raspberry Pi Configuration (Menu > Preferences > Raspberry Pi Configuration). Change the Boot setting to ‘To CLI’ and click OK. Now when you reboot, you’ll start in the command line (enter startx to boot into the desktop).
Find your location in the command line
The first thing you need to learn is how to find out where you are. You are in your home folder by default. Enter the following command and press RETURN:
pwd
This command is short for ‘print working directory’ and it tells you where you are. The command line will return /home/pi.
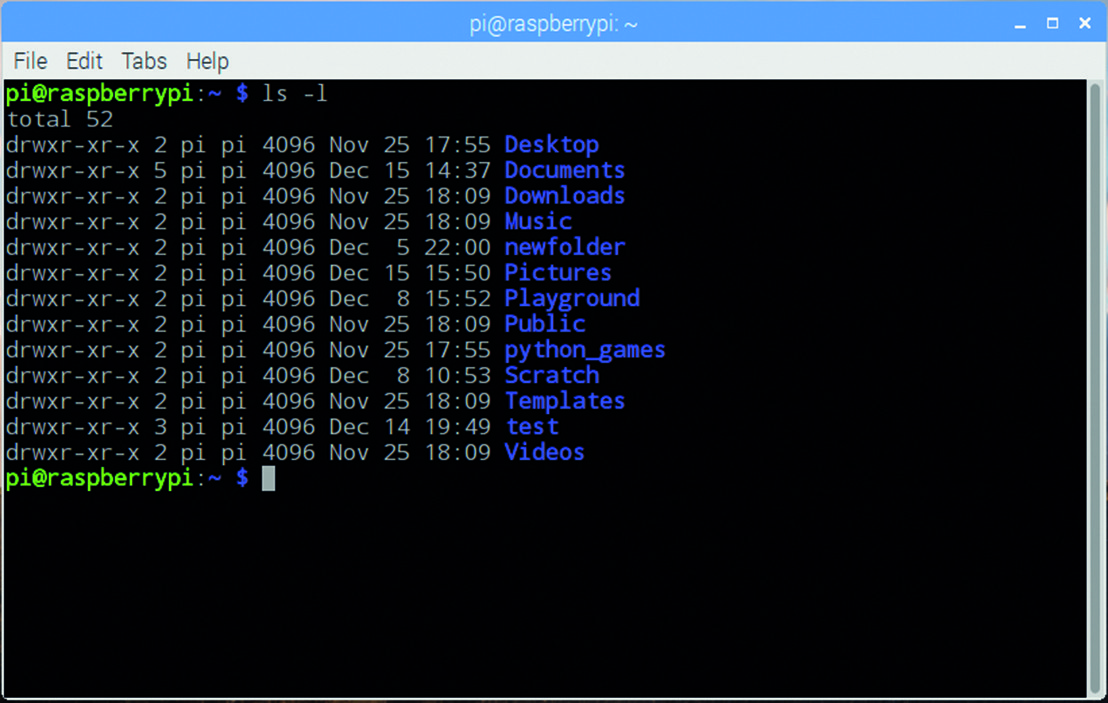
The home folder is the same one that appears by default when you open the File Manager app. You view the files and directories inside the working directory using the list (ls) command:
ls
Here you’ll see the same directories (or folders) that are in the File Manager app: Desktop, Downloads, Documents, and so on.
Understanding paths in Terminal
Before going any further with directories, you need to understand the file path and the difference between a ‘relative’ and ‘absolute’ path.
Files are placed inside folders (which are called ‘directories’ in the command line). In the visual GUI, you can see these as folders that you open, revealing files and more folders. Your home folder contains a Documents directory, and inside that are three more folders: Blue J Projects, Greenfoot Projects, and Scratch Projects.
/home/pi/Documents/Scratch\ Projects
In the file path above, the first slash is the root of your hard drive. Here you have a directory called home that contains all users. In here is another directory called pi (that’s you), and inside that is another directory called Documents, and inside that is one called Scratch Projects.
The eagle-eyed reader may have noticed the weird backslash character: ‘\’. You can’t have spaces in file names, so you use a backslash followed by a space at the command line. Most of the time you’ll also use the TAB button to quickly enter long file names (see ‘Tab completion’).
As mentioned, file paths come in two types: relative and absolute. Relative paths are ‘relative’ to your working directory, which is /home/pi/ when you start. Entering ls alone shows the contents of the current directory. You can view the contents of a directory inside your working directory using ls and its name:
ls Documents
You can also view the contents of the directory above you using two dots (..):
ls ..
This displays files relative to where you currently are in the file system. If you moved into the Downloads folder and entered ls Documents, it’d cause an error, because there is no Documents directory inside the Downloads folder.
An absolute path, on the other hand, always starts with a slash ‘/’, which is the root directory (the base of your hard drive).
Enter:
ls /
…to view the root directory. Here you’ll see all the directories and files that make up Linux. You’ll see directories like bin (for binaries), boot (files used to start up the system), and home, which contains your user folder.
Enter:
ls /home/pi
…and you’ll view the contents of your home folder, just as if you had entered ls from within it.
You can use absolute paths no matter what your working directory might be, because they always start from the root.
Changing directories in Terminal
Up until now we’ve stayed in the home folder and looked around using ls. You move from one directory and another using the cd (change directory) command:
cd Documents
Now enter:
pwd
…and you’ll see a different working path:
/home/pi/Documents. To move back up a directory (known as the ‘parent’ directory), you use two dots.
cd ..
Enter pwd again and you’re back in the home folder. Now try it using an absolute path. Enter:
cd /
…and you’ll be in the root directory. Enter ls to view the folders at the base of your hard drive. Enter:
cd /home/pi
…to move back to your home folder. There’s a shortcut for this:
cd ~
The tilde (~) character is a shortcut for your home folder. You can use it at the start of an absolute directory too. For instance, entering:
cd ~/Downloads
…moves to your Downloads folder no matter where you are in the system.
Working with files in Terminal
Throughout the file system, you’ll find various types of files. A good selection is in the python_games folder, so enter:
cd ~/python_games
ls -l
The -l part (an option) makes it use ‘long listing’ mode, which displays items with lots of information:
-rw-rw-r-- 1 pi pi 973 Jan 27 2015 4row_arrow.png

From left to right, each item is:
- Permissions: The users and groups that can access a file.
- Hard links: The number of files that are linked to this file.
- Owner: The person who owns the file. Usually either pi or root.
- Group: The group the file belongs to.
- File size: The name of the file.
- Modification: When the file was last changed.
- File name: The name of the file.
- The most obscure item is the list of letters and hyphens that make up the permissions. The first letter will be either a ‘-’ or a ‘d’ depending on whether it’s a file or a directory. Our 4row_arrow.png is a file, so it’s a ‘-’. After that are nine letters arranged into three groups of three (see Fig 1 overleaf):
- Owner: Typically this will be the person who created the account.
- Group: This is a group of users. You have only one group, pi, by default, containing just one user (also pi).
- Other: These are users from other systems.
Each of the three groups contains letters: ‘rwx’. These letters are always in that order and each is either the letter or a hyphen. A letter indicates that the person, group, or other has access to read, write, or execute the file. A hyphen means they don’t have that level of access.
Some examples include:
- rwx read, write, and execute
- rw- read, write, but don’t execute
- r-x read and execute
- r-- read only
Now that you’ve discovered how to move around the file system from the command line, it’s time to learn what else you can do.
Make a directory and file in Terminal on Raspberry Pi
One of the first commands you need to learn is mkdir. This stands for ‘make directory’. Move to the home folder and create a new directory called test:
cd ~
mkdir test
cd test
To create files, you use a rather odd command called touch. Officially, touch is used to update the modification time of files (reach out and ‘touch’ them). If you touch a file, it updates the time next to it to the current time.
Few people use touch for that. A happy by-product of the command is that if you touch a file that doesn’t exist, it creates an empty file. Enter:
touch test.txt
You’ll create a blank file called test.txt. Enter ls -l and you’ll see the new file along with all its details. Notice that the file size is 0. This is because the file is completely empty.
We can edit the contents of the file using a text editor called nano:
nano test.txt
You can enter and edit text in nano, but the Save and Exit commands predate the traditional CTRL+S, CTRL+W standards. Enter a single line, ‘Hello World’, and press CTRL+O followed by ENTER to save the file. Now press CTRL+X to exit.
Enter ls -l again; you’ll notice that the file size has changed from 0 to 12. This is one for each letter (including space) and a newline marker at the end (you can see this character using od -c test.txt if you’re curious).
Delete a directory and file in Terminal on a Raspberry Pi
Let’s try deleting files. This command removes the file:
rm test.txt
Now move up to its parent directory and use another command, rmdir, to remove the empty test directory.
cd ..
rmdir test
Unfortunately, you’ll rarely use rmdir to remove directories, because they typically have files inside them. You can see how this fails using these commands:
mkdir test
touch test/test_file.txt
rmdir test
It will say rmdir: failed to remove ‘test’: Directory not empty. The solution is to use rm with the -R option. This option stands for ‘recursive’ and means it goes inside each directory (and subdirectory) and removes every file and directory. Be careful when using rm -R, as it’s permanent and deletes everything inside. Enter:
rm -R test
The test directory and everything inside will disappear. Unlike the desktop environment, there is no Wastebasket in the command line. When you remove files, they’re instantly gone for good.
Command options
Most commands have options that affect how they work. It’s common to use these three options with the ls command:
ls -lah
Options start with a single hyphen ‘-’ followed the letter for each option. The three options used here are:
- l = long listing format
- a = all including hidden files
- h = human-readable (makes large file sizes more readable)

Options are case-sensitive. So ls -l and ls -L are two different things (small ‘l’ is long listing format; large ‘L’ is dereference mode). Sometimes options are listed out in full. These start with two hyphens and have a single hyphen for spaces. This command is the same as ls -lah:
ls -l --all --human-readable
But it’s more common to see (and use) the single letter approach.
What is sudo in the command line?
Sudo stands for ‘substitute user do’, although it’s often also called ‘superuser do’. If you have multiple users on your system, it can be used to perform commands as another user.
It’s mostly used to get root access to your Linux installation. There is an account that controls your Pi user, called ‘root’. This is an all-powerful account, which can change just about anything on your system.
Your default account can view files in the root of the hard drive, but it can’t create or delete files at the root. Enter:
cd /
touch test.txt
You’ll see touch: cannot touch ‘test.txt’: Permission denied. However, enter:
sudo touch test.txt
…and the test.txt file will be created on the root of your hard drive. You can see it using ls -l.
Now try to delete it:
rm test.txt
It will say rm: remove write-protected regular empty file ‘test.txt’?” Enter Y and it’ll say rm: cannot remove ‘test.txt’: Permission denied.
You need to use sudo to remove the file:
sudo rm test.txt
You can see why sudo is such a powerful tool. Without it, you couldn’t install software using apt or apt-get. But with it, you can remove or delete vital system files. Enter ls /bin and you’ll see many programs (known as ‘binaries’) used by Linux. These include the ls command you just used. Accidentally deleting these files could make your system unstable.
So use sudo with care. In Raspbian you don’t need to enter the password to use sudo. On many other Linux systems, however, you will be asked for the password before you can use sudo.
What is man?
There are lots of ways of getting help inside the command line. The first command you should turn to is man. This stands for ‘manual’ and gives you instructions on Linux commands and tools. Enter:
man ls
…and you’ll see the manual for the list command. Notice under the SYNOPSIS it says:
ls [OPTION]... [FILE]...
This shows you the structure of the command. Almost all commands are in the ‘command, option, argument’ structure, although some arguments have more than one [FILE] argument (such as copy, which requires a source and destination file).
Press the space bar to move down the instructions. Here you will see a list of all the available options. With man, you can get detailed information on just about every tool on the command line. You can even get a manual for the man command with:
man man
If you need a quick reminder on how to use a command, try using it with -h or --help as an option:
touch --help
…tells you what options are available with the touch command. You can use this with many command-line tools to get a quick refresher on how they work.
Moving from a GUI to a command line is a vital skill for hackers and coders. Everything on your computer, from programs to preferences, is stored in the file system somewhere. Learning to use the command line makes you a more capable Raspberry Pi user.
So, the next time you make a file, move a file, or delete something, don’t head to the File Manager. Open Terminal and perform tasks from the command line. Soon it’ll be second nature.
How to get help from the Linux command line
We spend a lot of time in terminal, using the Linux command line environment on a Raspberry Pi. So it's important to learn how to get help and advice right from the command line.
In our beginner’s guide to the command line, we looked briefly at ‘man’, the manual you can access from the command line. We've also looked at how to customise the command line.
Terminal: using Man to get help at the command line
The man tool is so important that we think it deserves a more thorough explanation. And man isn’t alone in offering help on the command line.
Other commands like whatis, info, and apropos all offer support and assistance. And let’s face it, support and assistance are what you will often need at the command line.
Even seasoned coders don’t always know the correct command to type into the Linux terminal. This guide is all about the various ways to get help at the command line, so no matter what command you come across, you’ll be able to find out more information on how to use it.
man
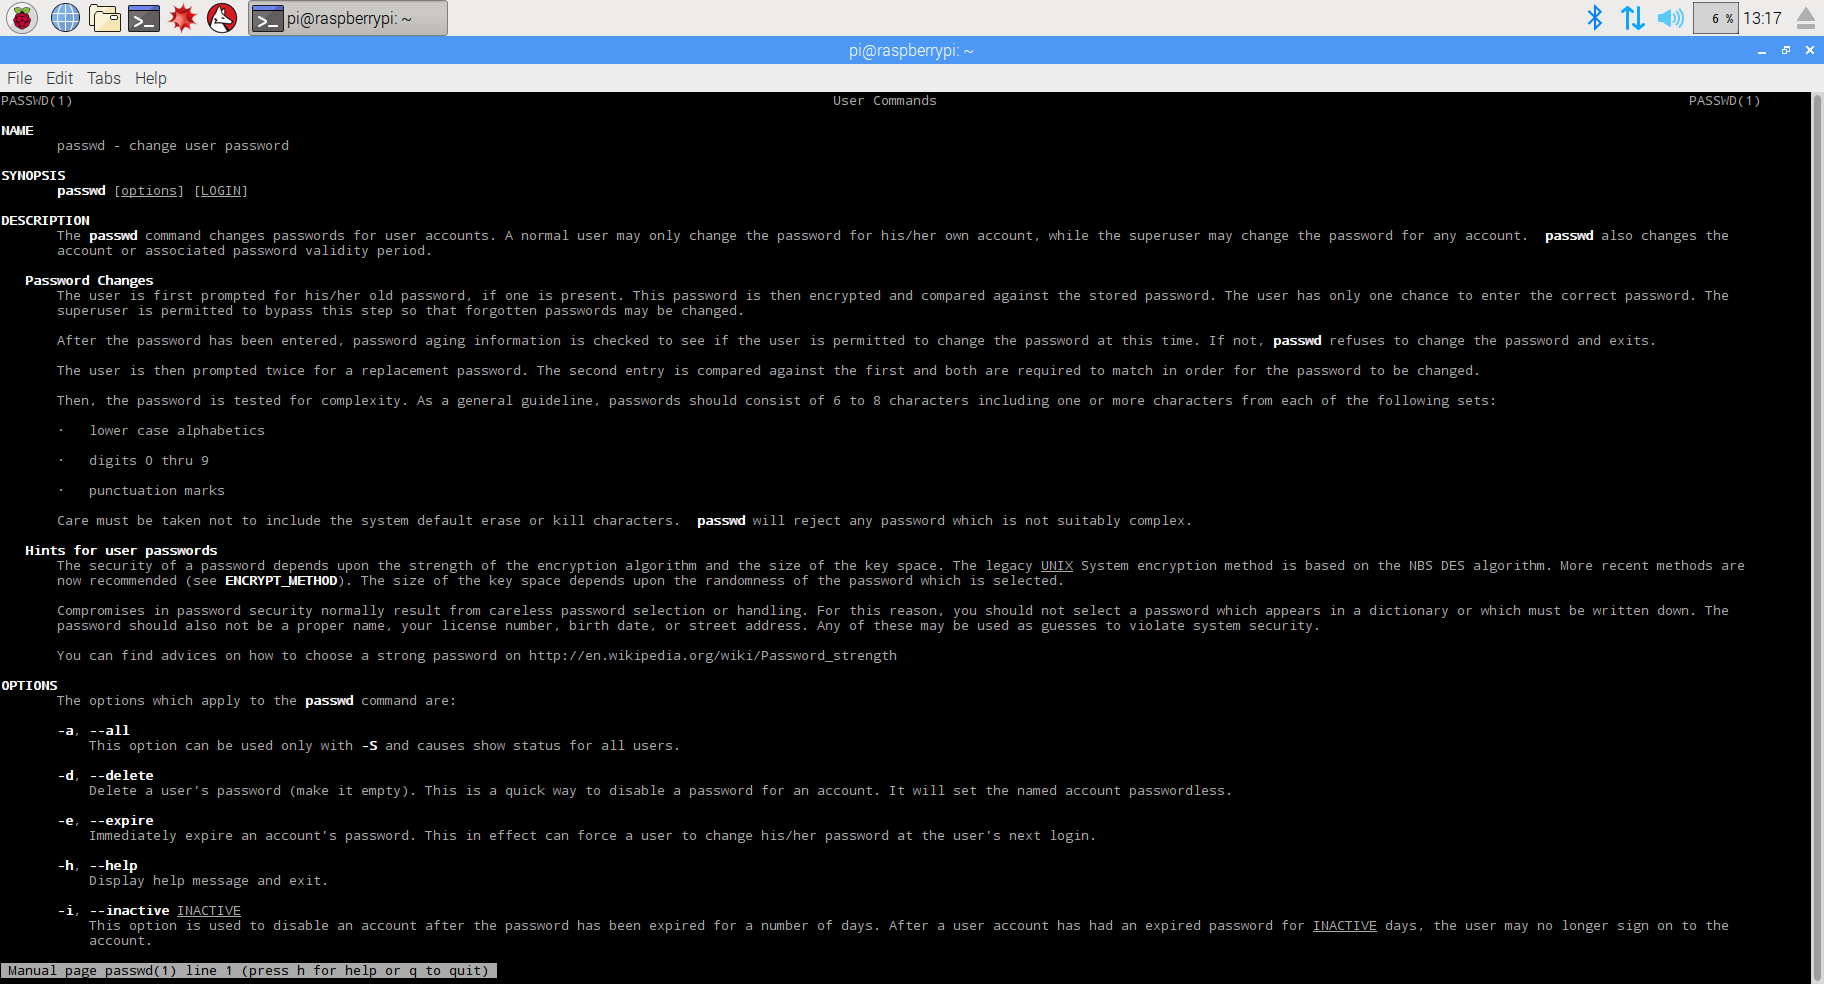
Your first point of call for getting help on the command line is man (short for ‘manual’). Enter man followed by the name of a command to get detailed information about it. For instance, enter:
man passwd
…and you will see detailed information about the tool used to change your password. Man screens are displayed one page at a time. Press the SPACE bar to move to the next page, and press Q to exit the page and return to the command prompt.
Man pages can be a bit tricky to read at first, but you’ll soon get the hang of it.
At the top are the Name, Synopsis, and Description sections. Read these to get an overview of the command. Below them you’ll find options and parameters; read these carefully to discover ways to expand your usage of each command. It’s a good idea to use man on any commands you know, and read the manual for any new Linux commands you come across.
You can even read a man page for man:
man man
Press H in the man screen to view a summary of navigational key presses. These are worth learning so you can do more than press space to move to the next page.
Use Info instead of Man in the Linux terminal
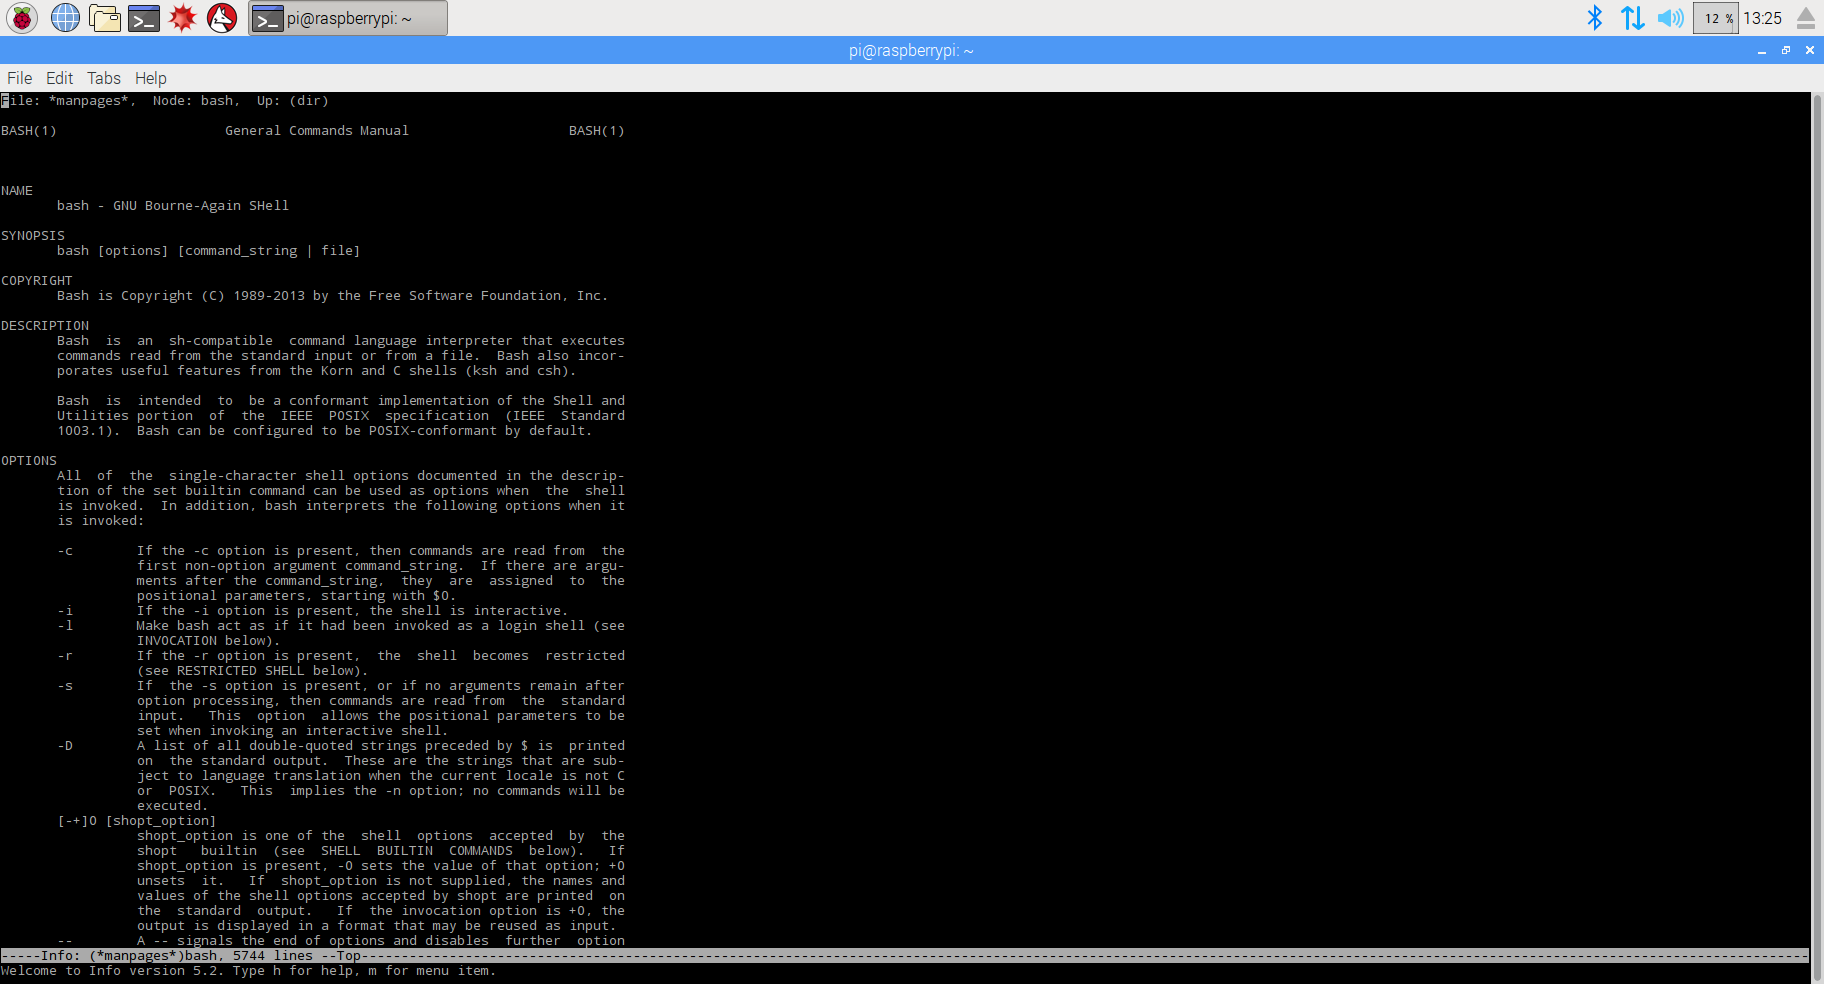
Man’s lesser-known partner is ‘info’, which is used to display information pages associated with commands. Sometimes these are the same as the man pages. In other cases they provide a different description. Try these:
man bash
info bash
While man bash gives you a brief description of the GNU Bourne-Again Shell and the options used with the bash command; info bash gives the whole history and hundreds of pages of detailed information.
Press H on an info screen to view the controls for navigating such long documents. As well as SPACE to move down, you use DELETE to go back a screen, TAB to highlight links, and RETURN to use them. Press Q to exit the help screen.
Get help with terminal commands
Terminal help: using man -k and apropros

As you become more familiar with man and info, you’ll start searching for commands to look up. Here, the man -k command comes in useful. In particular, try this:
man -k directory | more
This command lists all available man entries. Press SPACE to run through them one at a time.
The man -k option is worth remembering. If you use man man, it tells you the -k option is ‘equivalent to apropos’. Apropos is used to search manual page names and descriptions. It’s a handy way to find commands when you don’t know their names.
For instance, enter:
apropos directory
…and you’ll get a list of all the commands that have the word ‘directory’ in their description or page name. Here you’ll find common commands such as ls, cd, and pwd, but you’ll also find less obvious commands, such as mktemp.
Next to each command is a number, like (1) or (2). These correspond to the section numbers of the manual (view using man man).
The section numbers are useful for guiding you to the commands that can be used on the command line. As a general rule, 1: Executable programs or shell commands, and 2: System calls, both tend to be worth investigating. Higher numbers are for library calls, special files, and kernel routines for advanced users.
You can find out more information about any command using man:
man mktemp
This command gives you detailed information on how to create temporary directories.


