The latest update to Raspbian has brought the Scratch 2.0 offline app to the desktop. Our Scratch 2.0 for Raspberry Pi tutorial introduces all the new features.
Scratch 2.0 for Raspberry Pi sits alongside Scratch 1.4 in the Programming menu on your Raspberry Pi. There is a whole range of new features in Scratch 2.0.

Download Scratch Essentials. Your free guide to the world's leading visual programming language
One great thing about Scratch 2.0 is its compatibility with the vast range of Scratch 2.0 projects available on the Scratch website. You can run Scratch 2.0 projects in the Chrome browser inside Raspbian, and then click File > Download to your computer. Open the file in the Scratch 2.0 program running on your Raspberry Pi (using File > Load Project), and the project will run offline.
Scratch 2.0 for Raspberry Pi tutorial
Scratch 2.0 projects are not usually compatible with the older Scratch 1.4 program because there are lots of new features and blocks. One of the biggest new features is cloning, which enables a sprite in your stage to clone, or semi-duplicate itself. Cloning is a powerful object-orientated programming (OOP) feature that was sorely lacking in Scratch 1.4. It’s an essential part of many games and projects.
Scratch 2.0 for Raspberry Pi tutorial: new features in Scratch 2.0
You can also create custom blocks under the More Blocks section. This enables you to build your own blocks, and combine scripts that you use regularly into a single block.
There’s also a bunch of other new features such as a sound editor, Time blocks and vector editing. You can find a list of all the new features on the Scratch Wiki page.
>STEP-01: Backdrop name

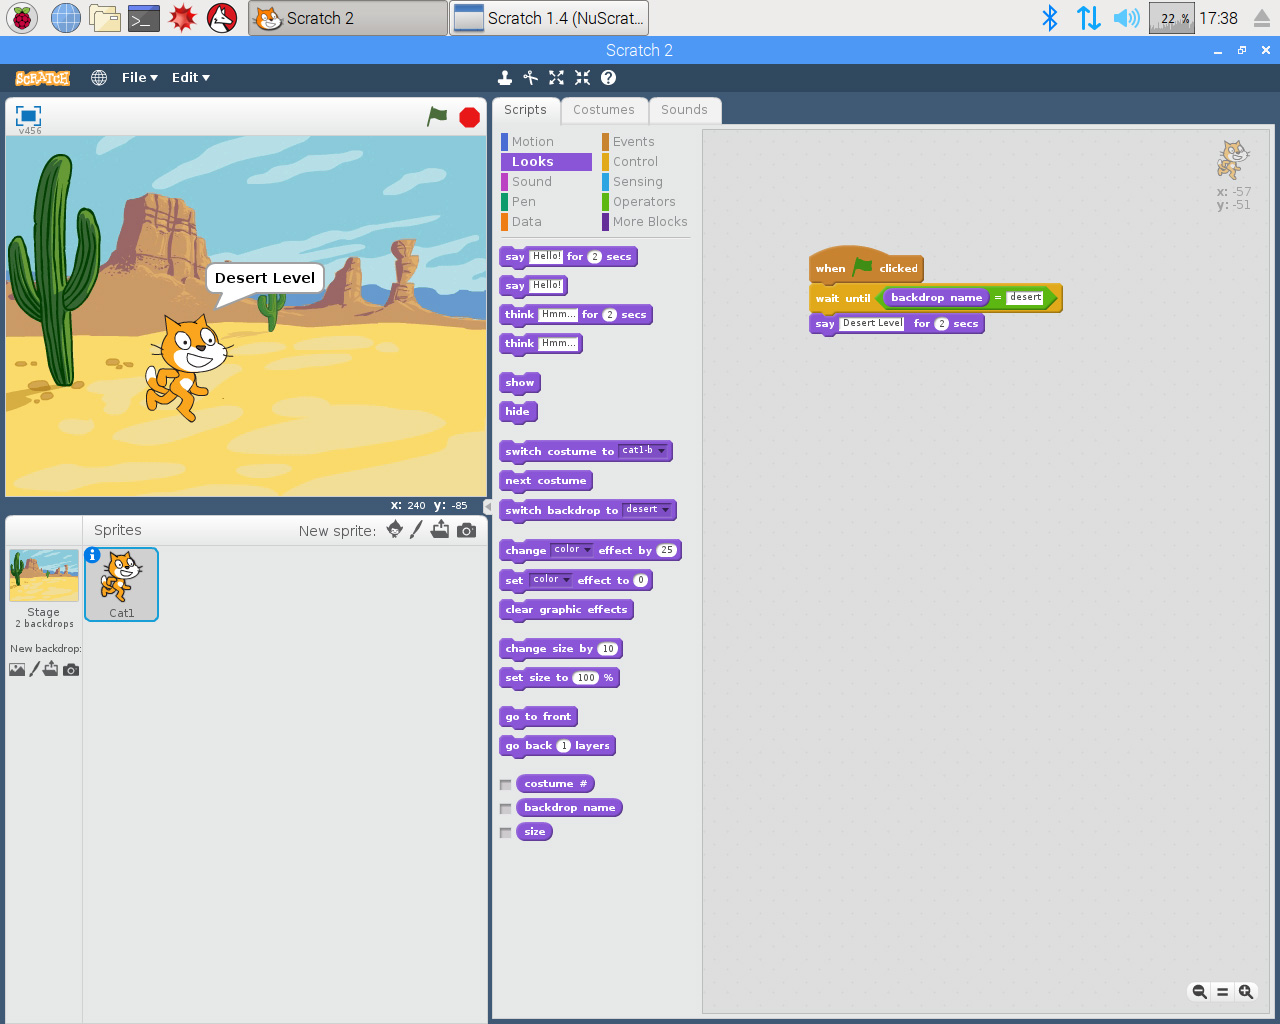
A new backdrop name block enables sprites to respond to specific backgrounds. You’ll find backdrop name at the bottom of the Looks block set. Drag it into an Operator block inside a Control block, such as: wait until backdrop name = desert and say Desert Level for 2 seconds.
>STEP-02: Cloning

Cloning is a big deal in Scratch 2.0. You could create a single space alien, and clone it to provide a swarm of enemies. You can also delete cloned sprites when they have completed tasks. Start by dragging a when space key pressed block to the Scripts area.
>STEP-03: Create a clone

Now click on Control, and at the bottom you’ll see a create clone of myself block. Connect it to your when space key pressed block. The clone will appear in the same location as your sprite: press the SPACE bar and it will look as if nothing has happened. Click and drag the sprite, and you’ll see that the clone appeared on top of the original sprite. Right-click and choose Delete to get rid of it.
>STEP-04: When I start as a clone

Clones can automatically run blocks of code when they are created. Click on Control and drag a when I start as a clone block to the Scripts area. Beneath it, add a move 100 steps block. This helps you to differentiate between the two sprites. Now add a say I’m a clone for 2 seconds block. Press the SPACE bar and you’ll see a new clone appear and announce itself. Right-click and choose Delete to get rid of it.
>STEP-05: Delete clone

Another neat feature is that clones can delete themselves. Delete makes it easy to quickly add and remove sprites from your scene (perfect for spawning and destroying enemies in a game). Add a delete this clone block to the bottom of the when I start as a clone block. Now the clone will announce itself and then disappear.
>STEP-06: Record video

Creating animations is one of the joys of Scratch, and a new Record Project Video option enables you to send a Scratch game or animation straight to a video clip. Choose File > Record Project Video and click Start to begin recording. A countdown will begin, and the recording will start. When you’ve finished recording, click the Stop icon below the Stage. Click Save, and the movie will be saved as a Flash Video (FLV) file. You need to install VLC to play back the movie.
Win! One of 10 Raspberry Pi 3 & Official Case signed by Eben Upton. Click here to enter


