
Turn your Raspberry Pi into the coolest console around with PICO-8! Play, make, and share 8-bit games
At the forefront of a new wave of ‘virtual’ consoles, PICO-8 packs a pixel-perfect punch of 8-bit delights. Our PICO-8 for Raspberry Pi starter guide has everything you need to make your own games, from code to graphics to sound, it has a super-active and supportive community of makers and creators behind it.
With its own built-in game browser, PICO-8 has access to a huge library of games straight out of the gate. The good news is you can get it running on your Raspberry Pi in just a few steps, meaning you’ll be sitting cross-legged in front of the living room TV in no time.
This article first appeared in The MagPi 83 and was written by Dan Lambton-Howard
See also: Make Lua games with PICO-8 for Raspberry Pi
Install PICO-8 for Raspberry Pi: You’ll need
- USB game controller(s) (Any generic 2-button controller will do)
- PICO-8
- Keyboard, mouse, and an internet connection
Step 1: Prep a Raspberry Pi
First things first, you’ll want a Raspberry Pi set up and ready to go. These steps are tested on a fresh install of Raspbian Stretch with Desktop, so you’ll want to do the same. You can plug in your USB controller (PICO-8 supports one or two) and, for these first few steps, you’ll need to plug in a USB keyboard and mouse as well. Once you’ve got it all up and running, though, a controller and WiFi is all you’ll need to download and play games.
Step 2: The Lexaloffle shuffle
Next, you will want to download a copy of PICO-8 from the Lexaloffle website. To do this, you’ll need to set up an account and buy a licence, which is a steal at around £12 at the time of writing. Once you’ve done that, go to the Downloads section of your new account on the website and download the Raspberry Pi version of PICO-8. You can use Chromium to download the zip file straight to your Raspberry Pi. Note: with your newly acquired licence, you can download Windows, macOS, and Linux builds of PICO-8 as well. A nice perk!
Step 3: 3, 2, 1… launch!
Extract the contents of the zip file into your /home/pi directory. Navigate to the newly unzipped folder and you will see a bunch of files. Most interesting for us is pico8 (not the .dat), which is the virtual console itself, and manual.txt. The manual contains loads of valuable information, tips, and commands to get the most out of the console, and will help loads when you start to make your own games. But as we’re focusing on playing them in this tutorial, ignore that for now and launch PICO-8 by double-clicking the pico8 file.
Step 4: Time to SPLORE
Beepidy beep! Wasn’t that cute? All being well, you should be looking at the PICO-8 command prompt, complete with flashing cursor, begging for you to type something in. Type in HELP to see a list of commands, many of which might be familiar to you if you’ve used Terminal commands on Raspberry Pi before. Now that’s all well and good, you say, but where are the games? Thankfully, PICO-8 has its own built-in game browser called SPLORE. Type in SPLORE and hit ENTER.
Step 5: Taking control
Plug in a USB controller if you haven’t already, and let’s take it for a spin. PICO-8 refers to its games as ‘carts’, as in cartridges (remember those?). Use the D-pad to navigate between the tabs. You’ll see a section for new carts, a search function, a tab for your favourite carts, and a file browser for your own creations. Let’s scroll to the Featured tab, select Update, and push a button. PICO-8 should now connect to the game library and present you with a list. Scroll down to find one that piques your interest and push any button to start.
Step 6: A veritable cornucopia
Congratulations! You now have access to hundreds of homebrew wonders. You’ll find everything from straight-out action arcade, to quirky indie titles, to demo-scene experiments, to de-makes of popular titles (where famous games are remade in 8-bit, just because). If you want to try something else, hit the Start button to open the menu, where you can return to SPLORE and jump into another title. You can also use this menu to ‘favourite’ carts, so that you can find them more easily.
![]()
Step 7: Personal picks
You’re probably feeling a little overwhelmed at the number of carts out there and are wondering where to start. Well, here are handful of your author’s favourites. Enigmatic boss battler Just One Boss by Ayla Myers, chunky squirmy puzzler Tomato Worm by Jose Guerra, mysterious puzzle platformer Dusk Child by Sophie Houlden, tear-jerking space-’em-up Orbiter Suite by Andrew Anderson and aquatic action game SWORDFISH by yours truly. That should be enough to start with, but new ones are released almost daily.
Step 8: Get dedicated
Now it’s working and you’ve tried a few games, let’s turn your Raspberry Pi into a dedicated PICO-8 console that launches straight into the cart browser when it boots. There are lots of ways to achieve this but the quickest, though possibly not the most elegant, solution is to edit .bashrc. This file contains a load of commands which run every time a new interactive shell is launched; for example, when opening a new Terminal window. Exit out of PICO-8, open a new Terminal, and enter sudo nano /home/pi/.bashrc to edit it.
Step 9: Cart boot sale
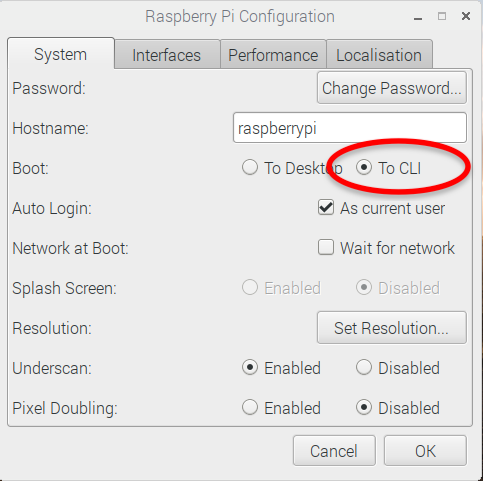
Add sudo /home/pi/pico-8/pico8 -splore to the last line. This command will launch PICO-8 straight into the cart browser. Save the script and, on the desktop, go to the Raspberry Pi menu in the top left, then to Preferences, then Raspberry Pi Configuration. In the System tab you’ll need to change ‘Boot:’ to ‘To CLI’. Now on boot, we’ll go straight into PICO-8, no need for a keyboard or mouse. Save your changes and reboot to see your new favourite console in all its majesty.
Step 10: Behind the scenes
Great, now you have a dedicated PICO‑8 console, well done, but what’s next? Well, as mentioned, you can use PICO-8 to easily make your own games. We’ll go into more detail about that in the next tutorial, but for now if you are curious, why not take a look under the hood? Plug in a keyboard and mouse, launch PICO-8 and load up a game, then return back to SPLORE. Next, hit ESC to exit to the PICO-8 console; once there, hit ESC again to swap to the code screen.
Step 11: The tools at your disposal
You’ll now be staring at the code editor, and at the very code that runs the game you loaded. At the top right of the screen you’ll also see icons that allow you to navigate between the other editors. From left to right, there are editors for code, sprites, maps, SFX, and music – all you could ever need! Have a click through to see what they look like. We’ll go into detail on these in later tutorials, but for now why not try editing some of the sprites, then hit CTRL+R to reload the game with your changes?

Step 12: Join the community
One of the most unique and exciting aspects of PICO-8 is the enthusiastic community of makers, tinkerers, and developers that has built up around it. People are very passionate about the console and are always willing to lend a hand and offer help. We highly recommend getting involved. You can find them on the official Lexaloffle forum, the PICO-8 Discord server, or by searching #pico8 on Twitter. There are plenty of resources out there if you simply can’t wait to get started making your own games. Happy making!


