
The second-generation pi‑top laptop is a device that has been long awaited by the Raspberry Pi team. While the first attempt was an interesting home-brew attempt to 3D-print a laptop, this is the point where it goes professional.
Subscribe to our YouTube channel for more video reviews!
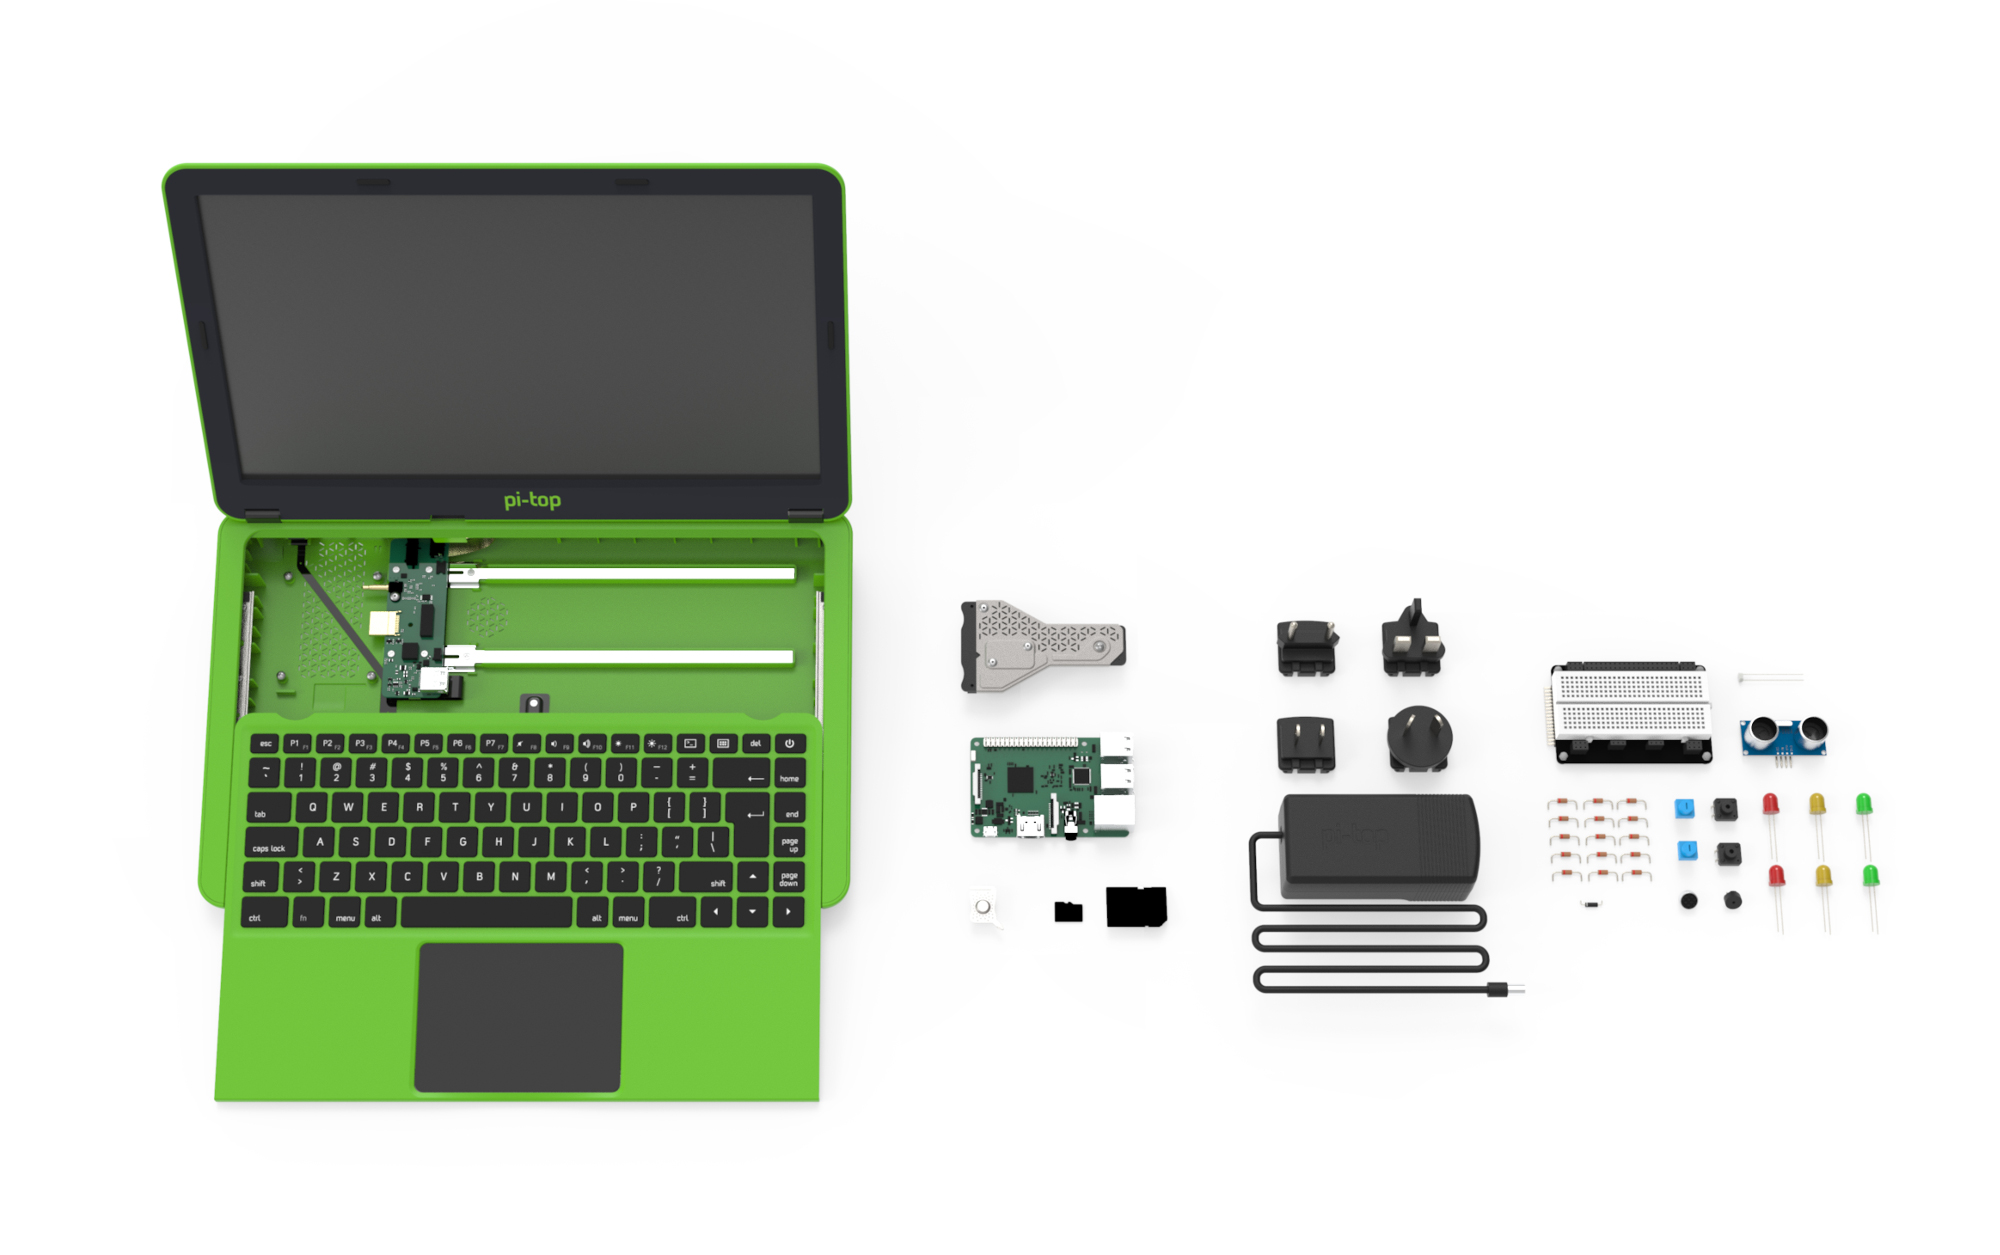
Inside the box you get a pi-top housing, Inventor’s Kit, power supply and, of course, a Raspberry Pi 3 computer.
The pi-top kit does require some assembly. The Raspberry Pi is screwed into place behind the keyboard. It takes up two USB ports, leaving two free and accessible from behind the laptop case. A Hub PCB slides to the right of the Raspberry Pi and hooks into the 3.5 mm jack and HDMI socket.
A metal Cooling Bridge bridges the gap between the Hub PCB and GPIO pins on the Raspberry Pi. It’s required to power the Raspberry Pi, however, and you can’t remove it and access the GPIO pins on your Raspberry Pi directly.
The Cooling Bridge blocks off access to the GPIO pins, and prototyping takes place on the separate pi-topPROTO+ board (which has a pin breakout along with analogue pins).
Setup is easy. Really easy. It literally takes five minutes. Obviously this is good in one respect, because it reduces the potential for problems.
We can’t help wishing the build had slightly more to it. The keyboard, screen, trackpad, and battery all come in the pre-assembled kit and the assembly process felt vaguely superficial.
Design notes
There are some truly great touches to the design. Let’s start with its marquee feature, a sliding keyboard that moves down to reveal the inner components. It slides smoothly and clicks into either position.
The chiclet-style keyboard is a joy to type on, with the same level of quality you’d find on an Intel-based laptop.
You can keep typing with the keyboard down thanks to a clever sliding cable system. And behind the keys lie two magnetic strips. Parts such as the PROTO+ and separate pi-topPULSE accessory clamp onto the rails.
There’s even a neat multi-tool accessory. One end is used as a screwdriver for the Raspberry Pi and Cooling Bridge. The other is a neat clamp that holds a microSD card so you can slide it in and out of the Raspberry Pi without having to remove the board. Clever stuff! We hope whoever designed the multi-tool got a pay rise. It also clamps on to the magnetic rail so you can take it with you.
Above the keyboard sits a glorious 1920×1080 display. It’s a vast improvement on the previous model, and is surrounded by a nice bezel with rubber feet to hold it neatly against the keyboard when closed.
All of which is powered by a battery providing six to eight hours of life. We easily got a full day out of it, and it held charge for a week without losing all its power.
Beneath the keyboard is a larger trackpad which – and it pains us to say this – sucks. It is sensitive to taps and brushes that frequently move the cursor unintentionally. We ended up connecting a mouse instead of using the trackpad.
PolarisOS
Once everything is set up, you can start using the pi-top with the custom PolarisOS software. This is a custom build of Raspbian Jessie with extra software such as Google Drive and Google Docs. You also get neat extras such as Turtle ART and 3D Slash.
Alongside Minecraft Pi and Python games is an extra offering called pi-topCEED Universe. This is a neat top-down adventure game where you have to use code to solve challenges.
And there’s a built-in app called pi-topCODER. This contains worksheets for everything from getting started to building electronics projects. Set up an account with pi-top and you get tracking stats for the number of lines of code you’ve created, and the worksheets you’ve completed.
And you can always run Raspbian Stretch, which was recently updated with pi-top extras such as a battery gauge.
Is the price right?
At £259 the pi-top is by no means extravagant in the laptop world. But it’s a far cry from the $35 computer that the Raspberry Pi itself represents. Even at £259 you don’t get everything on offer. Accessories like the pi-topPULSE ($49.99) with an RGB matrix cost extra. You can even spend an extra $19.99 for a speaker, which isn’t included in the base package (although you can listen to sound using the headphone socket).
Of course, buying a Linux laptop for the same price misses the point. Along with the pi-top you get a fantastic Inventor’s Kit containing LEDs, buttons, SH‑SR04 echolocation sensor, and a potentiometer. And you can prototype on a Raspberry Pi using the GPIO breakout pins on the pi-topPROTO+).
And let’s not forget it includes Mathematica. For some people, this alone could be worth the price of admission. Mathematica costs £210 for a Home & Hobby licence. It’s free with Raspbian.
The pi-top also contains three high-quality cardboard cut-out kits and a raft of software and workshops for kids. This enables kids to build a cardboard robot, spaceship, and music maker alongside learning basic coding and electronics skills. We think these are great projects that perfectly blend physical construction activity with coding. Well done!
Last word
4/5
An amazing environment for kids to learn computing and digital making. And it's pretty good for adults who want to prototype Raspberry Pi projects on the move. Vastly improved upon the original pi-top, but still with quirks. We're taking off a star for the trackpad, but connect a mouse and this is the perfect laptop.


