
When it comes to image editing on the Raspberry Pi, you have several options. The default program, called Image Viewer, is based on GPicView. It’s extremely fast and lightweight, and you can use it to rotate images.
At the other end of the scale is GIMP. Raspbian is built on top of Debian, and most Linux users reach for GIMP (GNU Image Manipulation Program) for heavy image editing. It’s capable of professional image retouching, including perspective distortion and channel mixing.
The good news is that GIMP runs just fine on a Raspberry Pi. It could be accused of being overkill for quick image manipulation, but if you want to go the whole hog, enter:
sudo apt-get install gimp
Then head over to the GIMP Tutorials page to find out what you can do.
Use Mirage for image editing on a Raspberry Pi
In our tutorial, we’re going to use something a little lighter, and a little cooler.
We’re going to install a program called Mirage. This is a lightweight photo viewer that can also resize, crop, rotate, and flip images. It features basic colour editing and file management, and it’s perfect for our lightweight needs:
sudo apt-get update
sudo apt-get install mirage
>STEP-01: Open in Image Viewer
If all you want to do is view a file, then double-click on it in File Manager (or use xdg-open and the file name in Terminal). The Image Viewer app will open, enabling you to view the image. You can use the yellow Rotate and Flip buttons to flip the image around.

>STEP-02: Open Mirage
For slightly more power in your image editing, open Mirage (Menu > Graphics > Mirage). Now, choose File > Open Image and pick an image on your Raspberry Pi. The Thumbnails Pane on the left shows all the other images in the same folder, which makes it easy to switch between images.

>STEP-03: Rotate images
It’s easy to rotate images. Select the image in the Thumbnails page and choose Edit > Rotate Left/Rotate Right. Use Flip Vertically and Flip Horizontally to mirror-flip the image.

>STEP-04: Crop an image
Choose Edit > Crop to open the Crop Image window. You can draw a marquee selection box around the smaller image in the preview window. Its dimensions will display in the X, Y, Width, and Height text boxes (these values can be changed manually). Press Crop to remove the unwanted part of the image.

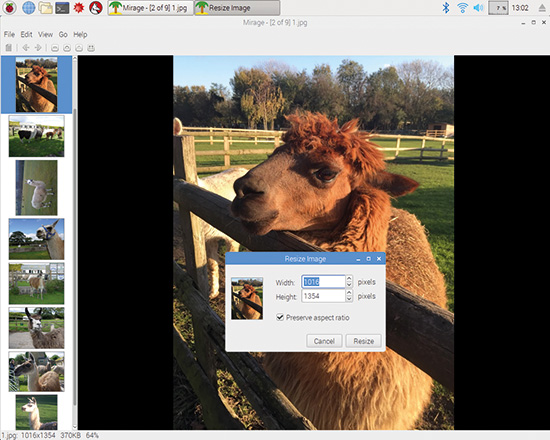
>STEP-05: Resize an image
Sometimes you need an image set to a specific size, for use on a webpage or to display accurately in a document. Choose Edit > Resize to open the Resize Image window. Adjust the properties in the Width or Height boxes to adjust the image size. By default the image will maintain its proportions; deselect the ‘Preserve aspect ratio’ box to adjust the Width and Height independently.
>STEP-06 Saturate an image
While Mirage doesn’t have the powerful colour-correction facilities of GIMP, you can adjust the colour saturation (which is often the best tool for touching up an image). Choose Edit > Saturation and use the Saturation level slider to change the value. As you move the slider, the image will display the new levels. Press Saturate when you’re happy with the image. Use File > Save Image to keep your edits.


