
The cost of food is rising. Why not use your Pi to build a hydroponic garden? Eat better and dodge those expensive food prices! Hydroponic growing is efficient, healthy, and easy to maintain – especially when you can build a system that allows you to leave the garden, and monitor it remotely from an internet connection, for under $50 (£38).
This article appears in The MagPi #62 and was written by Kent Elchuk, a Raspberry Pi enthusiast, web developer, and gardening author who is likely to be tinkering with code or working in the garden.
Hydroponic gardening with a Raspberry Pi
Growing pesticide-free, hydroponic, or organic hydroponic produce has never been easier – especially now that the Raspberry Pi is here to help. A hydroponic garden might not be the first place you would expect to find a single-board computer, but in this project it provides essential video monitoring and moisture detection.
The project also uses a Raspbian-compatible plug-and-play webcam to provide the video, and the Motion Linux tool to handle the monitoring. To detect soil moisture, you can pick up a cheap breakout board online. The sensor can be assembled in minutes, with just a few connections that hook up to three Raspberry Pi GPIO pins and a moisture-detecting probe.
Moisture detection and video monitoring will provide the information you need to take care of your hydroponic garden, and you can be alerted to any problems via your internet connection. A simple home web server is all you need.

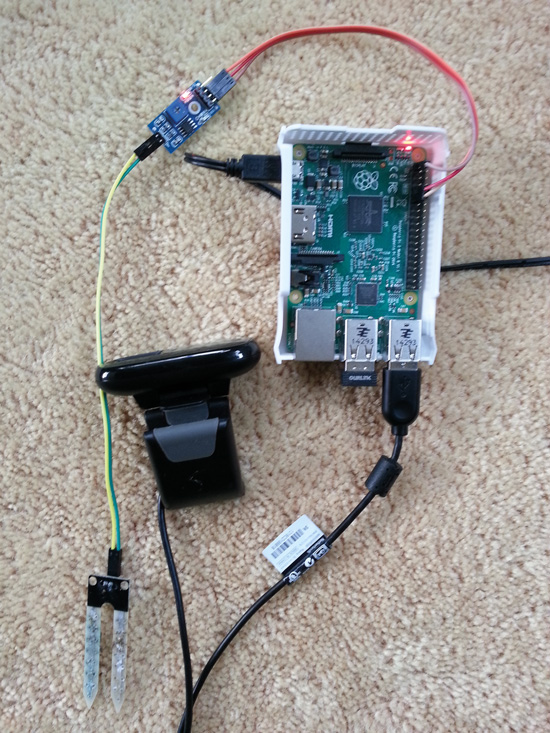
- The moisture probe's metal plates are inserted into the plant pot
- There are two lights on the sensor board – one light will always be on, and the other switches on when water is detected
- The orange wire connects the sensor board to GPIO 17, the red wire to ground, and the brown wire to the power
Visual monitoring of hydroponics
Nothing can replace visual monitoring of your garden. Using your webcam, you can inspect your crop from remote locations.
Check the Raspbian compatibility of any webcam before purchase. You’ll find a list of Pi-compatible webcams here.
First, you’ll need to install Motion:
sudo apt install motion
The next step is to edit the /etc/motion/motion.conf file. You will need to edit it in a text editor such as vim or nano:
nano /etc/motion/motion.conf
Carefully make changes to the file to match the following code. Until you make these changes, the system won’t work. It is a good idea to back up the original file before making any changes.
daemon on
width 640
# Image height (pixels). Valid range: Camera dependent, default: 288
height 480
framerate 5
ffmpegoutputmovies on
snapshot_interval 60
streamlocalhost off
webcontrollocalhost off
And finally:
vi /etc/default/motion
startmotiondaemon=yes
Restart the Motion service with sudo service motion restart. Always keep in mind that you can use the update-rc.d command to ensure that a program starts automatically after a fresh boot:
sudo update-rc.d motion enable
When Motion saves video or JPEG files, they are stored in the /var/lib/motion folder. By default, the files are timestamped, and the most recent file is always titled lastsnap.jpg, which makes the file system easy to work with.
During a Motion installation, it is likely that the folder where the files are saved will need new permissions. To give that folder owner and group permissions for Motion, type:
chown -R motion:motion /var/lib/motion
At this stage, you should be able to access the Raspberry Pi from a browser (http://local_pi_ip:8081) and see the streaming webcam video – even after a reboot.
Home web server
A home web server is the easiest way to access the most up-to-date picture of the garden from a remote location. It also allows you to interact with the moisture sensor. To access your home server, type the home IP address into your browser. If you don’t know your IP address, you can find it at iplocation.net.
It only takes a few commands to install a web server and PHP, and make your Pi into a home server. To keep this tutorial simple, the following commands show how to install the Apache web server and PHP:
sudo apt-get update
sudo apt-get install apache2
sudo apt-get install php7.0 php-pear libapache2-mod-php7.0 php7.0-mysql
sudo apt-get install php7.0-curl php7.0-json php7.0-cgi
With these packages installed, you should be able to view the new website at your IP address via a browser or with a free online proxy. Make sure your router can forward port 80 to let you see the webpage, and optionally port 8081 for live streaming.
Hydroponics: Monitoring water levels
The soil moisture sensor is a common Pi add-on, and hooking it up is easy. The moisture sensor board connects to three GPIO pins on the Pi: GPIO 17, power, and ground. The sensor board is also connected to the metal plates of the moisture probe.
The unit works straight away – all you need to do is stick the probes into a pot. If you see only one light on the sensor board, add some water. After adding water, you should see two lights. In our experience, the moisture detection light illuminates after watering, but the sensor board can go down to one light within an hour, even though the soil or growing medium has retained some moisture. You can use this system to make sure a scheduled watering has happened.
The script used in this project to detect moisture uses PHP. PHP has a shell_exec() function that allows the easy use of Linux shell commands instead of using a GPIO library. Find the code in the code listing box.
Remote access of the hydroponics system
Let’s start tying everything together. We have a script that detects watering, and lets us know if watering is on or off. Watching this is very easy: just open the page in a browser.
Since seeing is believing, viewing the lastsnap.jpg file lets you see how the plants are doing at any time. This image is saved to the Motion folder, and you can set up a cron job (use crontab -e) to move this file to the HTML folder and display it in the browser:
* * * * * cp /var/lib/motion/lastsnap.jpg /var/www/html/test.jpg && chown pi:pi /var/www/html/lastsnap.jpg
The resulting page shows the live stream, the most recent image, and a message reporting the results from the sensor. Save the URL to your phone and open it at will. You can display your data as shown in this tutorial, or just set up the parts you want to use.
Hydroponic basics
Although the focus of this article is about monitoring the plants, it is helpful to know a little about vertical hydroponics, which uses interlocking quad pots stacked on top of each other.
When growing, tomatoes can be stacked two or three pots high; lettuce, cucumbers, and peppers do well with five or six pots stacked up. The stacking gives very high yields per square foot.
![]()
To feed the plants, nutrients are delivered using a pump that sends liquid nutrient through half-inch polythene tubing. Along the half-inch header line, barbed fittings are inserted so that quarter-inch tubing can send fluid to each pot. Irrigation into the pots takes place slowly, regulated by drippers inserted into the ends of the pipes.
Plant stakes are used to hold the drippers in place. At the very bottom of the system are individual three‑gallon (11-litre) pots that catch the waste nutrient. These bottom pots also hold plants.
In each pot, you can use a medium like soilless mix, coco coir, peat/perlite mix, or even well-draining dirt. As far as feeding is concerned, any hydroponic plant fertilizer is fine – powders are often much cheaper than liquid. A food-grade 55-gallon (208-litre) drum makes a good, cheap, food-grade nutrient tank.
When you mix a nutrient solution, a pH pen and EC/TDS (total dissolved solids) meter will help to fine-tune the plant diet. You can cut costs by using pH test strips or a liquid pH test solution. Normally, your water and mix pH values will be consistent, so you shouldn't need to test them very often. A pH of 6.0‑6.5 works for most vegetables, while 1500‑1800 ppm (parts per million) TDS indicates a decent fertilizer salt concentration. When growing lettuce, a lower TDS value (400-500) may be sufficient.
Hydroponically grown produce can yield big harvests and lots of growth, so be ready to supply some support for your giant plants! On the other hand, lettuce is easy to care for, and many varieties of tomatoes will trail downwards without requiring any support.
As well as producing plenty of pesticide-free food all year around, a growing garden can bring enjoyment and peace to your home.
Hydroponic gardening tips
- Moisture detection. The system works best at detecting new water saturation, rather than measuring the ongoing moisture percentage with precision.
- Hydroponic feeding intervals. Use a timer to run one, two, or more predictable feeds per day.
- Remove old images. Remove JPEG images from the /var/lib/motion folder from time to time to free up disk space for future images.


